Advertise on Facebook Like a PRO
8 Easy Steps to Create an Effective Facebook Ads Campaign
Decided to advertise on Social Media, but not sure where to start, as there are so many Social Platforms out there? Is it Facebook, Twitter or YouTube ads that will bring you best return on dollars spent? No-one could tell you what would work best, without analyzing your company, products and target audiences, but the most popular choice would definitely be world’s largest Social Media network – Facebook (FB), with 2.7 billion active users in 2020.
We also recommend FB ads as our second preferred Pay Per Click Advertising option after Google Ads. Facebook has 225 million active accounts just in the US, which automatically assumes that majority of your potential customers have FB profile and will be searching for products and services to satisfy their needs on this platform. Therefore, having Facebook Business Page is one of the first steps you need to do to promote your Brand awareness online. Yes, your website still remains number one digital awareness tool on the Web, but Facebook business page along with Google My Business profile are crucial for overall awareness credibility and top SEO rankings.
Get to work, create and optimize your FB Business page. It has to be linked to your personal Facebook account. Add general info, hours of operation, services, prices, images, videos, so your potential customers can better understand what products/services you sell. Also add info about you and your company, so they have a clear idea of who they are dealing with. Be transparent and keep open communication, as all those small things will end up in positive interactions, 5-star reviews on your FB page which will deliver you likes, shares, sales and overall credibility.
Next, in order to create your first Facebook Ad Campaign, you would need to click on Ads Manager. Then it will take you to a step-by-step guide to create your ad, here is the outline for the process we are discussing in this article:
-
- Choose the Objective
- Name Your Campaign
- Create Ad Copy
- Select Your Target Audience
- Select Budget and Scheduling
- Choose Ad Placements
- Add Payment & Start the Campaign
- Analyze and Optimize
Step 1. Choose your objective
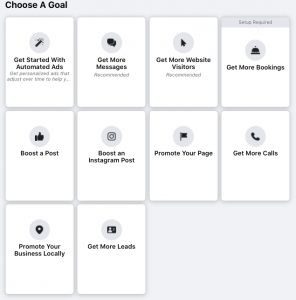
Log into Facebook Ads Manager and select the Campaigns tab, then click Create to get started with a new Facebook ad campaign. Facebook has eleven different marketing goals based on what you want your ad to achieve. Here are FB ad campaign goals in relation to your advertising objectives:
- Brand awareness – introduce your brand to a new audience
- Reach – Expose your ad to as many people in your audience as possible
- Traffic – Drive traffic to a specific web page, app, or Facebook Messenger conversation
- Engagement – Reach a wide audience to increase the number of post engagements or Page Likes, increase attendance at your event, or encourage people to claim a special offer.
- App installs: Get people to install your app.
- Video views: Get more people to watch your videos.
- Lead generation: Get new prospects into your sales funnel.
- Messages: Encourage people to contact your business using Facebook Messenger.
- Conversions: Get people to take a specific action on your website (like subscribe to your list or buy your product), with your app, or in Facebook Messenger.
- Catalog sales: Connect your Facebook ads to your product catalog to show people ads for the products they are most likely to want to buy.
- Store traffic: Drive nearby customers to bricks-and-mortar stores.
Since majority of us prefer to target actual clicks and not just impressions, aka Pay Per Click, we would select conversion-oriented goal – Lead Generation, so we would only have to pay for the add if someone clicked on it, went to our site or sent us a message.
Step 2. Name Your Campaign
After selecting your Campaign Goal (Lead Generation) you would be prompted to the next screen, where you need to name your Campaign first. We recommend to have a clear and easy to understand name for each campaign, as if you will be running several Facebook Ad campaigns with different business objectives it will be hard to distinguish which one is where if all of them will be called April Sale 2021 or Facebook Sales, etc.
In our case we are naming our campaign – FB Lead Generation PNW, adding ad goal and Geo location, as we might be running a different campaign for California and Midwest. Here also you would need to determine what exact information to ask your potential clients. Since it is lead generation campaign, what information would make it a qualifying lead? Is it a phone number, address, email, company they work for? etc. There is a list of generic questions you can enable provided by Facebook Ads Manager, or you can add any customized question that you believe will benefit number of leads received.
Step 3. Create your Ad Copy
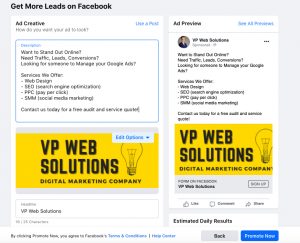
After pressing “Next” button in the previous screen you would get to the ad campaign main set up page. Here you would need to start with writing short description of your company, product, service.
We recommend not to put too much information; use bullet points, list your top services, mention your best-selling products, highlight unique selling proposition. Make sure they will remember you because you sell “Best tacos in Seattle”, or “Top-Rated Marketing Agency on Yelp”, or you offer “Free shipping on all orders over $25”, etc.
Depending on the ad type you select you will have an opportunity to add image, slideshow or even a video to your ad. Make sure you use high resolution images done professionally as regardless of what you will say on the ad, if images are not up to PAR, entire ad will be perceived as garbage and overlooked. Did not mean to be harsh, but that’s the reality of the “perfect” world we live in, perfect pictures, perfect product thumbnails, perfect social media accounts.
Step 4. Target Your Audience

This is very important and useful feature for your ad to show only in front of people who are a part of your target audience. When audience targeting is properly set up and optimized, it will save you a lot of clicks that won’t convert, therefore marketing dollars will be used towards potential customers who are more like to buy your product and service, which will improve click to conversion ratio.
Let’s imagine you are selling a beard grooming product, but forgot to exclude female Facebook accounts; do you think it will reduce your click through rate? Yes, it definitely will comparing if you had men only campaign. One may disagree with me saying that ladies also look at those things, especially when looking for Christmas presents for their hubbys… But majority of the buyers are man, and probably those who are over 25 years old, so by excluding those 2 target audiences (women and all accounts under 25) you are giving your FB ad a better chance to show to a right customer who will be more likely to buy.
Next, we will discuss targeting options, start by selecting your location, age, gender, and language. Keep an eye on audience size indicator, which shows a potential number of clients in your geographically selected location. Facebook will also give you an estimate of page likes you will get, but remember those are only projections.
After basic targeting is selected, you have an option to fine-tune your target audience through detailed targeting, as you want to be as precise as possible when showing your ad. This would increase your ad’s chances to convert (bring you sale or generate lead) and make it more effective digital marketing tool in your disposal. It will also deliver a better Return on Ads Spent (ROAS).
In detailed targeting you can optimize your target audience by advanced demographics (education level, financial situation, if they are married, have kids, occupation). You can also select potential customers by their interests and behaviors. Let’s assume you are selling fitness equipment for home, so you would like to target people who are:
-
- Like to work out
- Prefer healthy lifestyle
- Interested in fitness
- Losing weight
- Interested in healthy eating habits
Here you can also exclude people who you think won’t end up buying your products or services based on their interests. Example of excluded audiences would be:
-
- People who are going to the gym (do not work out at home)
- Interested in running outside (do not need equipment)
- Audiences interested in nutrition supplies (not likely to buy gear)
- Powerlifters (work out at powerlifting gyms not at home)
You get the idea, yes both audiences listed above are pro-fitness and interested in healthy lifestyle, but based on your product (in home fitness equipment) you are excluding those clients who could possibly click on your ad, but most likely would not make a purchase, as what you are selling is not something they will use. By using this narrow targeting technique, you would be able to save advertising budget and use it to show your ads in front of accounts who are more likely to convert.
Last but not the least in your targeting strategy would be selecting your current audience or excluding them and focusing only on new accounts that fit your criteria mentioned above, but have not engaged with your account yet. Back to our home fitness equipment example, you can include only those customers who already purchased from you (loyalty promotion) or exclude them completely, if you are running a special for new customers only, something in line with “20% off exercise bikes for all new sign ups.”
Step 5. Set your Budget and Schedule
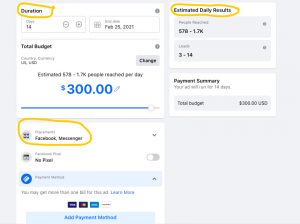
Once targeting is finished you need to decide on your budget. Good way to think about it as how much are you willing/able to spend on your Facebook ads per day. Then multiply it by 30 days to realize your monthly FB ad budget. In the budget set up process you can select max daily spend as well as max cost per click (CPC); so you won’t spend more on a click than profit that click might deliver. You can get into pretty fine detail about how you want to spend your money using the advanced budget options in Facebook Ads Manager.
In the same window you will be also asked to select ad campaign start and end dates, you also have an option to start it right away or plan it to start in the future – following Monday for instance. Next part of scheduling is to select days and times when you prefer your ads to run, which is very important feature as it allows your ads to show in front of your potential clients, only when they are on Facebook. Keep your schedule organized and monitor ads performance; you can always run several ads and compare results to better understand which schedule worked best for your featured product; weekend campaign VS weekday campaign, or AM ads VS PM ads etc. Once all the budgeting and scheduling selections are done, make sure you are happy with audience size estimate and if you are, move on to the next section – placements.
Step 6. Choose your Facebook ad placements
Here you select where your ads will appear, just Facebook, or Facebook and Instagram and Messenger, or a variation of those 3 platforms. Facebook will be always included as they all run under Facebook umbrella.
If you already know which platform your target audience is most likely to engage with your ads select them. But if you are new to FB ads, you can start with selecting all 3 platforms and after first 2 weeks monitor each placement’s performance. And optimize your ads based on clicks and conversions they brough. You may also do research on general Social Media audiences, and get an idea that 30-40 year old moms are more like to be on Facebook. And teenagers and college students (15-25 year old crowd) is more active on Instagram. All depends on products/services you are offering and what target audience is most likely to benefit from them.
Once you become experienced advertiser and gather data to improve your Facebook placements you can choose from the following options:
- Device type: Desktop or Mobile
- Platform: Facebook, Instagram or Messenger
- Placements: Stories, Feeds, in-stream (for videos), messages, in-article, and apps and sites (external to Facebook).
- Specific Operating systems: iOS, Android, Windows, or all devices.
Step 7. Add your Payment, Preview & Start the Campaign
Very easy step, select method of payment, credit card, PayPal or bank account for funds to be taken from. Also make sure to include your company name and tax Info. As your Facebook ads amount spent should be deducted from your sales; and decrease the amount of income taxes you need to pay.
After that, click the preview button, to see how exactly your ad will show up in front of potential customers. You can check preview across different platforms, placements and devices. When you are happy with what you see, go ahead and start the campaign.
Step 8. Analyze and Optimize
Just like anything else in Digital Marketing, your Facebook ads need to run for a couple weeks and gather data. Then it is time to look at the data, and evaluate what has worked and what has not. Depending on your campaign goal, leads, likes, sales, analyze what placements, times of the day, demographics performed best for you. This is where you would want to increase your ad presence. On the flip side look for audiences, placements, devices that brought you clicks but not conversions? Or those that did not create any traction at all? Most likely you would need to get rid of them, unless your campaign is brand awareness. Therefore you are targeting impressions and clicks rather than conversions.
Even if your campaign is bringing you lots of clicks and likes; you still need to pay close attention to its settings, budgeting and targeting. Think Business first and main goal of business is to make money, so why not make even more? Or what if you spent more on ads than they bring you in profit after all other expenses? What is your brake even point per conversion? It may sound complicated at first, but once your account has data to analyze, you understand your goals and break-even points, then it becomes easy to turn your FB ad campaign into a money-making vehicle for your business.
Takeaway

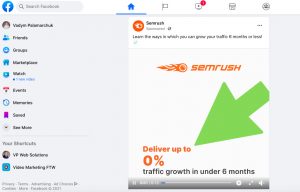
SEMRUSH Facebook Video ad on Facebook news feed. Great example for our article, Facebook Ad, that is set to target this account by interest – Digital Marketing
Follow 8 steps above and create an effective Facebook Ad. Promote your Brand on selected platforms across the demographics and audiences you selected. Let it run for a couple weeks with initial settings and analyze visitors’ feedback and ad results; clicks, conversions, cost per click, best performing ads, etc. Optimize based on results, increase budget on what is working and remove ads where it is not; keep monitoring and optimizing every 2 weeks. It will ultimately improve your ad reach and maximize conversions.
Unique advantage of Social Media is ability to speak directly to your client as a person to person. And hear what they have to say, and what their needs and preferences are. Use Social Media as a tool to speak to your clients, ask them what made them buy your product? Ask what they liked and what they didn’t about your ad campaign. Based on their responses, go back to your Facebook ads and tweak them again.
Look at your FB business page, does it reflect all the things your customers are asking for? If not, optimize your page too, add pictures, features, reviews. Very important to understand that nothing is constant and things that worked last year, might not work today. Customer’s likes and preferences change all the time, so should your products and marketing approaches. At the end of the day, it is not about your product’s features and warranty. It is about what solution they offer to your customers, what problem they solve for them and at what cost.
Sophie H 2/11/21


